DIY Part I
The Infamous Pocketfold Invitations
So these have been a SERIOUS labor of love. I can't even tell you how much time I have spent researching, designing, buying supplies and making these things! But I am so very happy how they have turned out and that I saved so much money making them myself. I can't promise your total cost will be super low, but the more you ask around and the more time you spend, the better the deals will be.
I think the pocketfold invitation is fun and versatile, so it's easy to personalize and make unique. I made mine by taking apart and making a template out of a popular pocketfold you can buy online. I think the way these are constructed make the pocket sturdier than most other DIY pocketfolds since there are two flaps that attach from opposite sides.
Directions below...
Step 1 - Materials
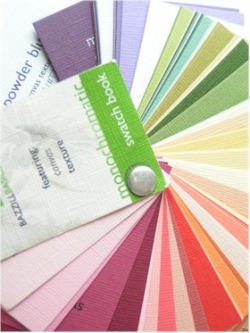
Paper: I made mine out of 12"x12" Bazzill cardstock. This is a good quality paper with the color all the way through (unlike scrapbook paper which, when cut, shows white), it comes in a variety of colors and textures and I found it online at Scrappindeals for $.43 a sheet. Mine has the texture "grasscloth" and the color is "avocado".
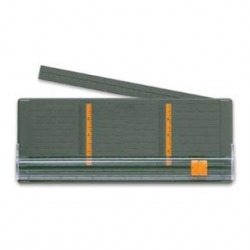
Paper cutter: I got a Fiskars paper cutter where the blade is in a track and there is a little arm that extends to make it 12". This is great for several reasons: you can switch the blade out for a scoring attachment (best invention EVER); you can measure the length of each cut precisely and only cut part-way into the paper; it's not very expensive; and it's not bulky. Some people don't like it as much because there is a chance that it won't cut as straight as the kind with the arm, but I didn't really have this problem as long as I was careful. Also, don't skimp on blades. When the blade starts to dull, change it. You will regret it when you realize later that some invitations are a little ragged.
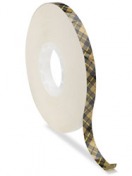
Tape: My biggest 'secret' is that I bought the industrial double-sided tape you're supposed to buy with an $80 tape gun... without the gun. It's a little silly, but this is the strongest tape in the world and the scissors you cut it with can be easily cleaned with a little acetone-based nail polish remover.
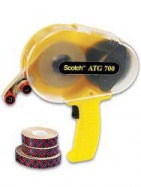
*Update* Figured out the kind of tape I used! I found it by googling and discovered it's sold by ULINE (the shipping supply company), but I actually bought it at a regular paper store. I have two kinds: "3M 908 Adhesive Transfer Tape" and "3M 924 - General Purpose". To the right is the gun and the second kind of tape. Below is the first kind of tape. Both work great although the one below is also acetone free, an added bonus for keepsakes.
Here is the paper cutter I used for making everything (mine is blue). It is Fiskars brand. I know that some people claim they won't cut as straight, but I didn't really have that problem most of the time (on occasion it would slip a little at the end, but for the most part I tried to go fast).
This one also makes it so you can 'start' and 'stop' cutting at a specific place (you will see in the directions below). In general I think I got a better cut going towards where I wanted to stop rather than start there and cut out to the edge (for example, Step 3).
Step 2 - Cutting and Scoring
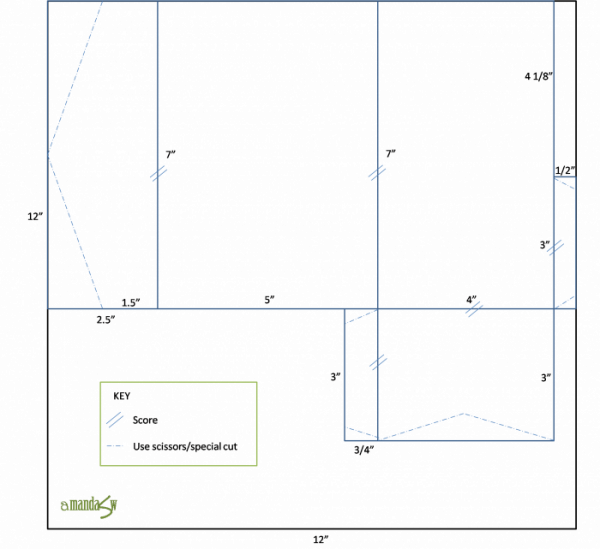
There is a particular order these steps go in so that it's most efficient. Just to make sure we're all on the same page... These directions are given assuming that the blade is vertical/perpendicular to your body and where "top" is farthest from you and "bottom" is closest to you. The end result is a 5x7 pocketfold from a 12"x12" piece of cardstock.
I also learned that switching out your cutting and scoring blades too many times makes the track a little loose, so I recommend doing a set at a time. For example, do 25 invitations at a time and cut all 25, then score all 25, then cut all 25 again. This will save you time and the possibility of hurting your paper cutter.
1. With the patterned side down, cut off 2" so that you have a 12"x10" piece of paper.
2. Move the paper in the cutter to the RIGHT so that it measures 7". Cut up from the bottom until the blade reaches 4.5" on the track.
3. Turn the paper 90 degrees counter-clockwise. At 5 3/4" cut until you reach the point where you meet the previous cut. You should be 3/4" from where you ended the other cut, this will be one flap for the pocket.
*switch to the scoring attachment*
4. Turn the paper so that the 12" side is at the top. You will score at 2.5" and 7.5" (also score the flap at 7.5", I usually lined it up just inside, towards the pocket since, if anything, it needs to be smaller so that it folds correctly. This would sort of be like 7.6"). At 11.5", score between 4 1/8" and 7", this is where the other flap will be for the pocket. Turn the paper so that you can score the pocket. This score should match up or be on the *outside* of where the pocket 'attaches' to the main part of the pocketfold.
*switch back to the blade*
5. Now cut at 11.5" where you didn't score (you will use scissors to cut the flap all the way out).
6. Mark in very light pencil on the outside/patterned side of the cardstock where the triangle will be. I had a template so that I didn't have to keep measuring, but the center is 2.5" from the score (where you scored it) and at the sides it's 1.5" from the score. Cut with the pattered side up.
7. Use scissors to cut the flaps for the pocket - cut them all at angles. I also cut a small triangle into my pocket. I just marked on the inside of the pocket in the center and 1/2" down.
**The reason the two flaps are different widths (one is 1/2" and the other is 3/4") is because on the one I copied, both were 3/4", but I just couldn't fit that onto 12x12 paper. I left the one at 3/4" because, well, I have no idea. But it couldn't hurt to have one bigger to make it stronger**
Step 3 - The Details

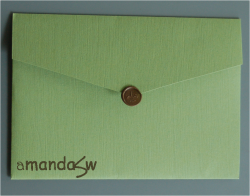
I'm closing my pocketfolds with a wax seal. I think it's very romantic and unique so I was excited to find that they sell wax that is made to withhold a trip through the mail. It has a higher glue content and is used with a low-temperature glue gun. It's pretty easy to use, but you definitely have to have a steady hand and press straight down with the seal or you'll get ripples.
**Update** The invitations have been sent and the wax seal held up just fine!
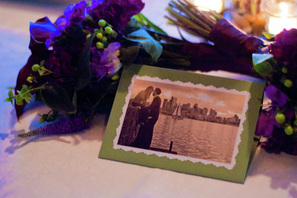
Then on the back side we're putting an engagement picture that has been turned into sepia. I'll be printing them with a white boarder and gloss finish to look like an old photo. For the final touch, I'm using Fiskars paper edging scissors "Victorian" style to make it look even more like the photos I found of my grandparents.
And in case you're wondering, no, you don't need an inner envelope when you have a pocketfold. We're writing the first names of all the people invited on the flap above the wax seal. Finished product:
Now for the Inserts
I firmly believe a pocketfold is only as good as its inserts so I took just about as much time creating, cutting and matching ("what is this?" you may ask. Well, that's what you do when you are a little OCD about it looking perfect. I'll explain later) these as I did making the pocketfolds.
The main invite and inserts were all printed on Classic Linen, natural white cover cardstock (#80). I was able to get a super good deal at a wholesale paper place where I live (which is why my overall cost was so low, I got 250 sheets for $10), but anchorapaper.com has this paper at a decent price too.
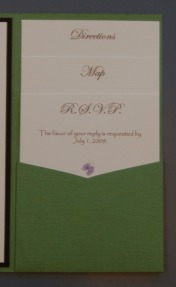
My inserts are all 3 3/4" wide by 6 3/4", 5 3/4" and 4 3/4" tall and were labeled "Directions", "Map" and "RSVP", respectively. I designed them in powerpoint by creating boxes those sizes and making sure that the information on the insert was below the height of the insert that would be in front of it. I could fit two "Directions" inserts on one page, 3 "Map" inserts on one page and 4 "RSVP" inserts on one page.
Then, once I was sure they were *perfect* I printed a page of each WITH the boxes. Using a similar method as I did for the pocketfolds, I wrote down each measurement where I would cut and the order. This way you don't have to worry about lines showing, pencil markings or other annoying stuff. Plus, after the first 5 you start to memorize it and it goes pretty quickly. So then, you go back to the computer and delete the boxes around the inserts. Print and follow the directions you gave yourself on where to cut.
Once all the inserts were cut I 'matched' them up in their sets of three. Because this isn't an entirely fool-proof process, each insert is a little different. So I sat there and made sure that every set was the exact same width by switching out pieces until I had a perfect match. It's not so bad, but you do look a little silly.
*The map*
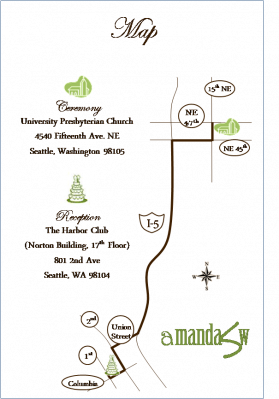
Well, when I first saw these I thought they were so cute and rushed to the website everyone was talking about, weddingmapper.com. In my opinion, this is a glorified version of mapquest. I was all excited thinking this amazing website would make me a cute map. So I followed the steps and get to the part where it explains what "print screen" means... This is when I realized it wasn't really going to make my life easier. But I was determined so I spent that evening making my cute map.
And many more evenings perfecting it.
In short, go to mapquest.com. Get diretions from the ceremony to the reception. Print screen. Paste into powerpoint. Use the drawing tools to trace over the driving route with a bold line. In a thinner line, trace over all main roads/intersections/etc. Lable everything. Then move the mapquest map out from behind.
At this point you can see if you're missing anything. Unfortunately you have to keep in mind that this is really more to look pretty than be of any real use. People are just going to mapquest it themselves later! (Sorry, but it's the truth) I've seen some pretty detailed ones that just get over-whelming. Keep it simple and easy to look over so people can just get an idea of what kind of trip they are in for.
You can use google image to find cute little icons and then when you're done, don't forget to group everything or you'll be very sad. Right click and save it as an image. This way you can resize it and it will stay proportional. Voila!
*I also learned doing this, that if you re-size it too much, the numbers will get difficult to read. If you have to change the size a lot, group all the lines with none of the text/labels, save it as an image, re-size THEN add back in all the labels.*
The Finished Product!
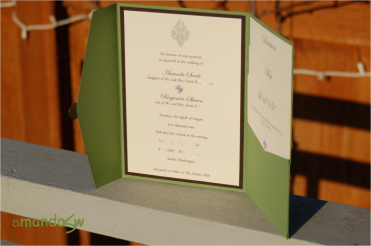
Here is the finished invitation. I cheated on the mat behind the invite and bought it from cardsandpockets.com because it was cheap and I actually couldn't really find a better deal (even assuming I cut it myself so it was an added bonus that I could skip that step). The mat is espresso, cover cardstock (#80) and measures 4 3/4" x 6 3/4".
The invitation part measures 4.5" x 6.5" (so each piece gets progressively smaller by 1/4") and once again, the finished pocketfold measures 5"x7".
(Photo courtesy of my sister Isabelle)
Ok, so this was just too cute to not include. My sister was trying to take some pictures when my cat Persie decided that she wanted to have her picture taken as well. And then, while she was there, my sister's cat Mr. Darcy (who my cat does NOT like) decided to join. And then... they started sniffing noses! Love is in the air...
RSVP Postcards
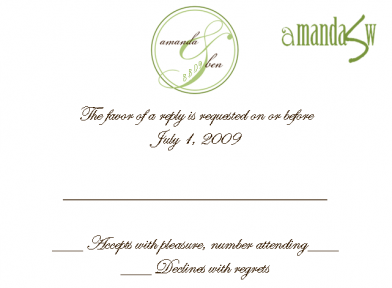
Dimensions: 3.5" x 5" (this is the smallest allowed)
