The Dress
**Updated** The fiance has pinkie-promised me (over the phone) not to look at the website again. So here are some inspiration pictures for my dress.
It's being made by my mom and a friend, Sarah Mosher, who has a master's in design. Most of the work is being done by Sarah actually because my mom's hands aren't what they used to be, but she'll definitely be working on it at some point.
The inspiration
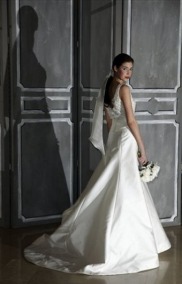
Ok, so here are the inpiration pictures for my dress. This first picture is the back of a Carolina Hererra dress that I found online one day and just fell in love with. Something about the panels and how it fits over the bum is just delicious!
I'm small, but to make up for this not being a giant ball gown, I'm having a very long train. The ceremony will be in a large church so I think that will be a nice way to take up some space.
I also plan on having a two or three point french bustle.
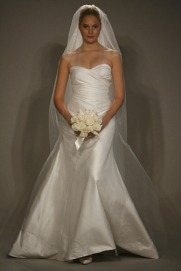
The inspiration for the front comes from a dress I actually tried on. It's a Romona Keveza dress from her "Legends" collection. I did go dress shopping, but it was mostly just to get ideas for what I wanted. You have to be honest with yourself about what looks good on you! I'm a pretty petite person and while I love love love some of the gorgeous ball gowns out there, they swallow me and/or I look like a doll.
This dress is made out of a silk taffeta so it's very light-weight, which is good for a summer wedding! The fabric will be white, but since it's a natural fiber, it won't be bright white, just a nice natural white. The shape will also be a compromise between these two dresses and not quite so mermaid-y as this one looks. The main thing I like about this dress is the beautiful soft rouching.
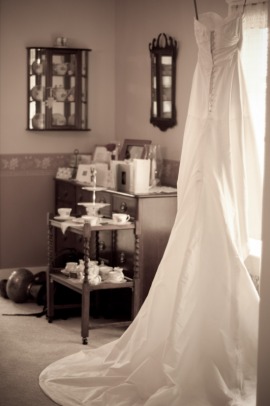
The Real Deal
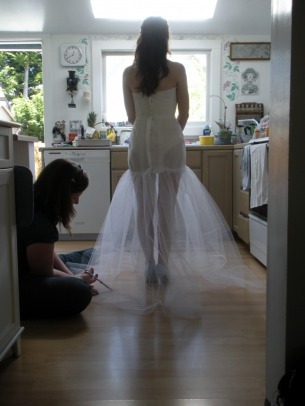
So below is the first photo I've received from Sarah. I'll hopefully add more since we have now had two fittings and this picture is from the first fitting. Keep in mind, at this stage we are desgining the structure and draping shape of the dress with muslin. Muslin is an inexpensive cotton material used at this point because you don't want to waste the expensive fabric! This therefore does affect some of how the dress looks - for example, the rouching - so just keep that in mind.
First Fitting- 3/16/09
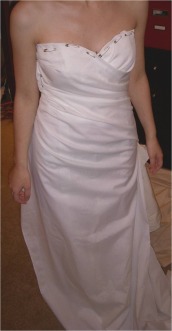
This picture was taken after the first fitting. She spent most of the time on the understructure - basically a corset, which you can't see unfortunately (it would also be indecent!). It's obviously very important that this part fits perfectly so I won't be doing the chicken dance (pulling up the dress) all night. That took probably a good hour if not more. Then she draped something to resemble what the outside would look like. We made lots of adjustments, but you can already see it coming together!
At this point there was really no back of the dress, so she just pinned on some extra fabric so we could get an idea of where we wanted it to flare out (not too high = ballgown, not too low = mermaid, etc).
This stage is like the rough draft of a paper, you have the basic idea and information, but it needs a lot of working-over and refining :)
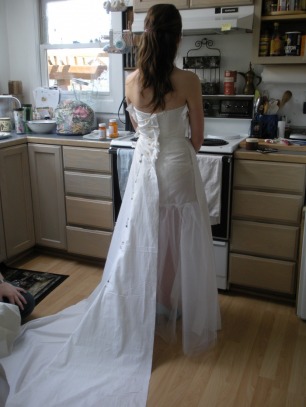
Second Fitting - 4/2/09
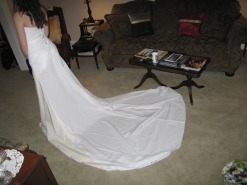
So I found the above pictures before the second fitting and sent them to Sarah, but it was pretty much after she'd done all the work based on what we had previously discussed. So this doesn't reflect our 'revelation' really, but is an improvement over the first fitting.
*This is still the muslin*
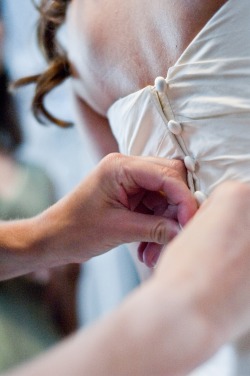
Another thing that I'm very happy about is that I'll be able to have real buttons on my dress!

Third Fitting - 5/16/09

1) Found a picture of me in the Romona Keveza dress (shh!), which helped Sarah see how that one fit on me
2) The real fabric for my dress came in and it's extra wide! which means the whole front fit SO much better - as Sarah put it, "Don't mess with Romona", she obviously knows what she's doing
3) Sarah decided to pretty much start over with wider muslin and drape it on me rather than a dress form (which she always found to be too big to represent me).
The result was that we ended up with something that actually looks like what I want! I feel a little bad that we basically started over, but the above factors only all came together this past week. There is no back of the dress in this picture, but it will be a little tighter through the hips than this which looks like an A-line skirt.
Again, this picture is still muslin, but you can tell how much of a difference the wider fabric makes.
Dress Update - 6/18/09
I've tried it on a couple times since the last entry to talk about where the boob insert things will be and how the back will come together. I'm so excited for it to be done already!
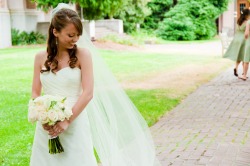
The Finished Product!
Shoes
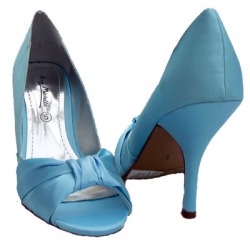
The shoes! I really wanted blue ones in the right shade, high heel (Ben is 1'3" taller than me after all), fairly comfortable and just "me" and I found them! In England. Well, on the UK ebay. So I had to pay a little extra shipping, but I really like them. I thought I would get strappy shoes, but every time I tried some on they just weren't as comfortable as I wanted. Sometimes I think strappy ones would be nice, but for now, I'm content :)
**Update**
So, as much as I loved these, there were several things wrong with them that have all luckily turned out to be fixable. First, the sole was horrible - on the inside and the outside. It was pretty cheap feeling, but I took it to a cobbler and he did an amazing job adding a much nicer sole. Ben and I already had our first dance lesson and it was perfect.
The other thing that helped was that I got Dr. Scholl's "For her ball of foot cushions". They are seriously a-mazing. It seemed weird at first, but they made a HUGE difference and I will never go back!
Jewelry
Sadly, this is one thing I've been putting off that most brides think about a ton. The main reason is because I have a couple sentimental pieces that do not match at all, namely a necklace and a bracelet. Then once I decide what to do about that, I have to think about earings. And finally, I have no idea what I want in my hair besides my cathedral length veil, especially after I take that off.
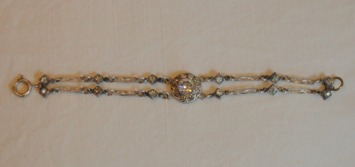
I have two beautiful antique pieces and then one that just sticks out, but I love. And still no earings. Or thing for my hair. What to do?!
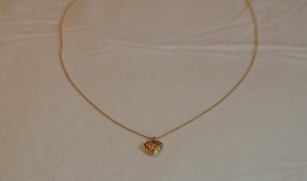
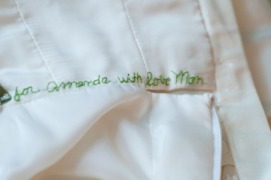
It's kind of difficult to see, but the chain is very tiny beads of gold and it is so delicate that I only wear the chain on special occasions (I wear the heart pendant on a different chain every day).
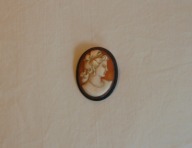
**Update: When I had it shortened, the lady kept the little pieces and said she could make some small earrings for me. I just got them back and they are beautiful. I think that might be the winner, at least for now.**
Bridesmaids' Dresses
These are also going to be made by the same woman making my dress, so I don't have any real photos yet.
But here are some inspiration pictures. I let the girls decide what style they wanted amongst themselves with my sister (MOH) in charge. Apparently all my friends are too laid back and couldn't even create drama if they wanted to. So my sister sort of made an executive decision with all of their (minimal) input.
The basic idea for the shape is to the right (JCrew "Sophia"). Right now the dress will actually be made out of the same fabric as my dress, which will give a nice matching-but-not-actually-matching effect.
I think this will look really pretty with the medium-dark shades of purple in the bridesmaids' bouquets!
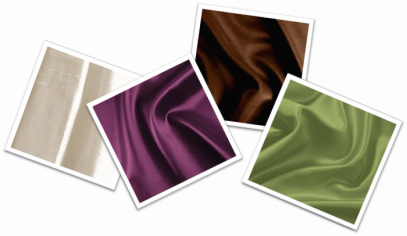
Here is my color palate and it includes the green I would like the bridesmaids' dresses to be.
For comparison, the flowers will be purple (a range from medium to dark), my dress is a silk shantung in white/ivory and other details are brown.
Groom/Groomsmen
Ben is going to wear a black tux with a white vest, white shirt and white tie.
The groomsmen will all be wearing black tuxes, black vests and a white shirt. Ties are going to be made out of the same green fabric as the bridesmaids' dresses so they will match nicely.
